Area F3 Overview
User & Course Master Data, Group & Role Management and Authentication
This document provides an overview of the authentication process within this project.
It also explains how to secure your endpoints, outlines the concepts of group and role management, and describes how to retrieve user data, user and course master data.
TL;DR
- User creation: Managed by multiple F3 teams.
- Team‑10: account creation
- Team‑8: group assignment
- Team‑11: user master data
Users cannot self‑register. HVS‑Admins create accounts for Hochschulverwaltungsmitarbeiter, who in turn are authorized to create accounts for Student and Dozent. Account creation can be done individually or in bulk via CSV.
- Login: Centralized via Keycloak using OAuth2 Code Flow with PKCE. Access JWTs are auto‑attached to requests via Axios, validated in the backend, and checked against roles.
- Roles & groups: Roles follow the naming scheme
[Area].[Team].[Read|Write].[Module]and are inherited via groups. Services must check roles before granting access. - User information: Team‑10 provides interfaces to retrieve user ID, first name, last name, email, and roles. Spring Boot projects can use the GitHub template; other stacks must implement JWT validation/claims parsing themselves.
- Additional APIs:
- Team‑10: account info (single user by ID, full user list)
- Team‑8: group memberships by user ID
- Team‑11: user master data (fields vary by user group, filtering/search supported)
- Team‑9: course master data (study programs, modules, courses, mappings)
- User deletion: Coordinated by Team‑10. A deletion event is published to the central message broker (Team‑12). Dependent services (e.g., Team‑11 for master data) must subscribe and clean up related data.
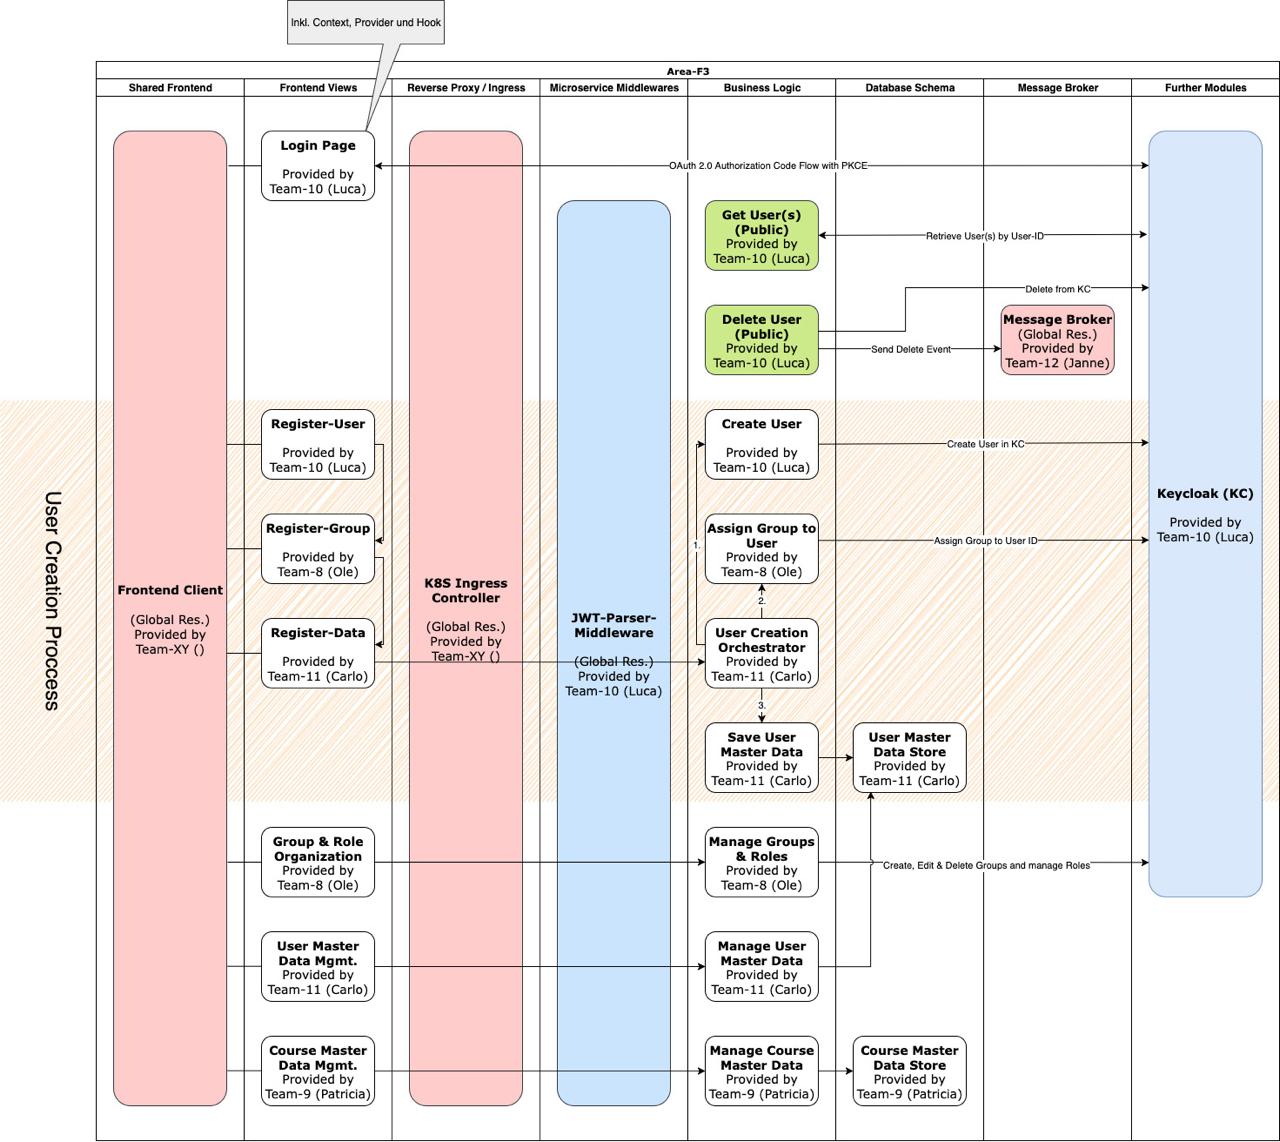
User creation process
The user creation process is managed by different F3 teams (please also take a look at the visualisation), each responsible for a specific part:
- User account creation - handled by Team-10 "HAriBO"
- Contact person: Luca Schmitz
- Consumes:
- First name & last name
- E-mail address
- Group assignment - handled by Team-10 "HAriBO"
- Contact person: Luca Schmitz
- Groups can be HVS-Admin, Hochschulverwaltungsmitarbeiter, Dozent, Student, or custom groups that inherit permissions from one of these base groups.
- Consumes:
- Selected group to assign to the user
- Collection of user master data - handled by Team-11
- Contact person: Carlo Bockermann
- Consumes:
- General user-related data
- Additional data required based on the assigned group
Note that users are not allowed to register themselves. Instead, the HVS-Admin can create accounts for Hochschulverwaltungsmitarbeiter, who in turn are authorized to create new accounts for Student and Dozent.
Account creation can be performed either individually or in bulk using a CSV file.
Login process
- Commissioned: Team-10 "HAriBO"
- Contact person: Luca Schmitz
When the frontend is opened, it first checks whether a valid token is already available.
- If so, the user is considered logged in.
- If not, the application will attempt a silent login in the background (e.g. via iFrame). This only succeeds if there is still an active session (valid token) with Keycloak.
- If the silent login also fails, the user is redirected to the Keycloak login page.
After successful authentication in Keycloak, the user is redirected back to the application and is now logged in (from the user's perspective this appears seamless).
In reality, a number of additional steps take place under the hood. If you are interested in the details, please refer to the OAuth 2.0 Authorization Code Flow with PKCE Docs.
After a successful login, the access JWT will automatically be added as a header to all requests made through Axios.
This means you don’t have to handle authentication against your backend manually. If you explicitly need to send requests without the access JWT header, you can use the unsecure Axios hook.
On the backend side, the JWT attached to incoming requests will be validated by the middleware/filter in the Spring Boot application (more details can be found in the next section).
All you need to do is define which endpoints require which roles (please take a look at the Role Creation section), allowing us to establish a fine‑grained access control structure.
How to secure actions to be only allowed for users with a specific role?
Backend
For Spring Boot projects, role-based endpoint security is already integrated into the official backend template. The template provides JWT validation middleware and role-based access control.
For implementation details and configuration examples, please refer to the security configuration in the backend template.
Teams using other backend technologies must implement JWT validation and role checking independently.
Note: More detailed backend implementation documentation will be available soon.
Frontend
To implement role-based access control in your frontend components, use the hasRole() function from the useUser hook:
import useUser from '@/hooks/useUser';

const MyComponent = () => {
  const user = useUser();

  // Check for specific role access
  if (!user.hasRole("Area-3.Team-09.Read.Stundenplan")) {
    return <div>Access denied - insufficient permissions</div>;
  }

  // Conditional rendering based on roles
  return (
    <div>
      <h1>Timetable View</h1>

      {user.hasRole("Area-3.Team-09.Write.Stundenplan") && (
        <button>Edit Timetable</button>
      )}

      {user.hasRole("HVS-Admin") && (
        <AdminPanel />
      )}
    </div>
  );
};
Best practices:
- Always check roles before rendering sensitive UI elements
- Use descriptive error messages for unauthorized access
- Combine role checks with conditional rendering for dynamic interfaces
- Remember: Frontend role checks are for UX only - always validate permissions on the backend
For more details on the useUser hook, see the frontend integration section.
Request Role Creation
If your service provides specific functionality (e.g., a timetable service), you may need to define a new role.
Roles represent access rights that can be assigned both to standard user groups (one or multiple of: HVS-Admin, Hochschulverwaltungsmitarbeiter, Dozent, Student) and, if necessary, to other microservices (clients).
Each role follows a standardized naming pattern:
[Area].[Team].[Read|Write].[Module]
Example:
Area-3.Team-09.Read.Stundenplan
Because the question was coming up quite often: Why does the naming scheme for roles include the area and team field?
→ The area and team components are not related to which Scrum team a user belongs to. Instead, they serve as administrative identifiers to clearly establish which team:
- ... provides the functionality for this role
- ... is responsible for maintenance
- ... serves as the contact person for clarifications
These technical identifiers remain completely invisible to end users, they only see the functional aspects of their permissions.
This role could be assigned to the standard group "Student", ensuring that all students automatically inherit read access to timetables.
In practice, this works as follows:
- A student logs in and receives the corresponding roles via their group membership.
- The timetable frontend checks whether the user has the role required to view a (unspecified) timetable.
- If authorized, the frontend requests the timetable from the respective microservice.
- The microservice then returns the relevant timetable data for that user based on the user ID contained in the validated access JWT (retrieval of this data is explained in the next chapter).
How can I request a new role for my functionality?
We have prepared a simple form that can be used to request the creation of new roles.
In this form, you will be asked to provide all necessary details so that we can create the role for you.
👉 Please already start considering which roles your service may require and to which standard groups they should belong (one or multiple of: HVS-Admin, Hochschulverwaltungsmitarbeiter, Dozent, Student).
Documentation and Request Form:
For detailed instructions on role creation and access to the request form, please refer to our role request documentation.
If you're already familiar with the process, you can directly access the role request form.
To verify whether a user has a specific role, please refer to the previous section.
How can I retrieve user information?
Team-10 "HAriBO" is responsible for providing access to the basic information of the currently logged-in user.
This information includes:
- User ID
- First name
- Last name
- E-mail address
- User roles and groups
Backend integration
For teams working with Spring Boot, JWT validation and role-based access control are already integrated into the official template repository in our GitHub organization. The template currently provides:
- JWT validation middleware/filter - automatically validates incoming tokens
- Role-based endpoint protection - secure your endpoints with specific role requirements
- User data interfaces (similar to the frontend useUser hook) are currently being developed for the backend-template. These will provide convenient, structured access to user information on the server side with methods like
getUserId(),getUserEmail(), etc.
To adopt new features or fixes, teams need to keep their repositories synchronized with the template:
For repositories with existing fork connection:
- Navigate to your repository on GitHub
- Click "Sync fork" → "Update branch" to pull latest template changes
- Resolve any merge conflicts if they arise
For repositories without fork connection (due to temporary private status 🫠):
- Add template as remote:
git remote add template https://github.com/Agile-Software-Engineering-25/backend-template-java.git - Fetch changes:
git fetch template - Create merge branch:
git checkout -b update-from-template - Merge template changes:
git merge template/main - Resolve conflicts, commit, and create merge request to your main branch
Alternative: Re-fork and migrate changes:
- Fork the current template repository
- Manually copy your custom code/configurations to the new fork
- Update your deployment/CI configurations to point to the new repository
For teams working with other backend technologies (e.g., Python, Go, Node.js), the same tasks as in the backend-template must be implemented independently. Each team is responsible for:
- Securely validating incoming JWTs
- Parsing and extracting user information from the tokens
- Providing well-defined interfaces within their own applications
Frontend integration
Similar interfaces are also being developed in the frontend-template repository to enable consistent access to the same user information in the client applications.
These interfaces are already merged into the root-ui and frontend-template repos and can be used via the useUser-Hook.
⚠️ Login is handled only in the root-ui repo, not in microfrontends (e.g., frontend-template). Microfrontends receive the user object from root-ui. To test frontend access to user data, start root-ui and integrate your microfrontend as shown in the frontend-template example.
useUser is a custom React hook that provides access to a global user state (OIDC user), keeps it in sync across components, and exposes helper functions like getFullName(), getEmail(), or hasRole(role).
How to use:
Note: The import path
@/hooks/useUserassumes your project is configured with the@path alias (e.g., in your build tool ortsconfig.json).
If you do not have this alias configured, use a relative import path instead, such as../../hooks/useUser.
import useUser from '@/hooks/useUser';

const MyComponent = () => {
  const user = useUser(); // get access at the top of your component

  console.log(user.getUserId()); // User id
  console.log(user.getFirstName()); // First name
  console.log(user.getLastName()); // Last name
  console.log(user.getFullName()); // Full name
  console.log(user.getEmail());    // Email
  console.log(user.hasRole("admin")); // Check role
};
⚠️ As a reminder: information provided by the frontend must never be trusted without proper validation on the backend.
Additional data access through APIs
In addition to the user information obtained via JWT parsing (in the frontend-template and the Spring Boot microservice), the F3 teams provide further data and functionality through dedicated APIs. These APIs allow services to query information about accounts, groups, user master data, and course master data.
Account information - Team-10 "HAriBO"
(⚠️ This functionality is still WiP!)
Beyond the data of the currently logged-in user (user ID, first name, last name, e‑mail, roles), Team‑10 will provide API endpoints to:
- Retrieve account details for a specific user by their user ID
- Retrieve a complete list of all users
API definition: Swagger
Contact person: Luca Schmitz
Group management - Team-8
APIs from Team‑8 will provide information on:
- Determining the group(s) a user belongs to by their user ID
API definition: Swagger
Contact person: Ole Leister
User Master Data - Team-11
APIs from Team‑11 allow access to extended user master data:
- Retrieve detailed master data for a specific user by their user ID
- The type and range of fields depend on the user group.
Example: Students have a specific field calledMatrikelnummer.
- The type and range of fields depend on the user group.
- Search and filter for users based on field values or ranges, returning matching user IDs.
- These IDs could then be used to call the Team‑10 API in order to fetch additional account information (e.g. names).
API definition: Swagger
Contact person: Carlo Bockermann
Course Master Data - Team-9
Team‑9 provides APIs for course-related structures:
- Provision of study program templates (i.e. virtual Modulhandbuch for the study program) and study program instances (i.e. specific program for a student group)
- Provision of module templates and specific module instances
- Provision of courses templates and specific course instances
- Retrieve which modules belong to which study program(s)
- Retrieve which courses belong to a specific module
API definition: Swagger
Contact person: Patricia Schiewald
User deletion
(⚠️ This functionality is still WiP!)
If your team requires functionality to delete a user account (for example, giving users the option to permanently remove their account for privacy reasons, or in other specific use cases), please contact Team-10 "HAriBO".
Contact person: Luca Schmitz
Whenever a user deletion is performed, an event will be published to the central message broker (managed by Team-12).
This event serves as a notification that a specific user account has been removed.
If your service stores data linked to user IDs, you can subscribe to this event and handle the cleanup of related records accordingly.
Example:
Team-11 manages user master data and stores entries tied to user IDs. By subscribing to the deletion event, Team-11 can automatically remove the corresponding master data whenever a user account is deleted.
Distribution of concerns in Area F3 (Diagram)